Is it best to screw or glue chipboard?
Chipboard is a popular, versatile material that’s widely used throughout the construction industry. However, the most common use of chipboard is in flooring.
Cost-effective, durable, and extremely hard-wearing, chipboard can handle high traffic loads, making it ideal for a wide range of flooring applications.
In this guide our Timber Products Manager discusses what chipboard is, how to install chipboard flooring, and whether you should screw or glue chipboard down.

What is chipboard?
Sometimes referred to as particleboard or low-density fibreboard (LDF), chipboard is a popular sheet material used for a wide range of applications, including:
- Flooring
- Loft panels
- Kitchen worktops
- Flatpack furniture
- Shelving
- General building work
Chipboard is made from reconstituted wood, usually chips, shavings, and sawdust, which are subject to high temperatures and pressure. Once cooled, the boards are sanded and cut to the right size.
Standard chipboard sheets are 2400mm x 600mm and are available in two thicknesses, 18mm and 22mm.
The benefits of using chipboard flooring
Chipboard is a popular material. It offers a number of benefits, including:

Strong
Chipboard is strong, durable, and able to handle high traffic loads. This makes it a perfect base layer to sit under a final floor covering.
Quick and easy to lay
Because chipboard is designed specifically for flooring, it is quick and easy to lay thanks to features such as tongue and groove connections, easy to transport panel sizes and a finished face that makes laying floor on top easy.
Cost-effective
Chipboard is cost-effective and less expensive than other types of flooring. However, despite its low cost, it doesn’t compromise on quality or durability.
Available in different grades
Chipboard is available in a variety of grades and densities to meet the needs of different applications. Lower densities are relatively soft and pliable, while higher densities are more rigid and suitable for heavy-duty applications.
At Elliotts, we sell a lot of chipboard, including Egger Protect, Egger Peel Clean Xtra, and Egger P5, in 18mm and 22mm thick.
Environmental benefits
Because chipboard is made with up to 70% recycled materials, it is more environmentally friendly than other materials, such as solid wood.
Should I glue or screw chipboard flooring?
Our Timber Products Manager always recommends glueing chipboard, as this continues the strength integrity of the floor.
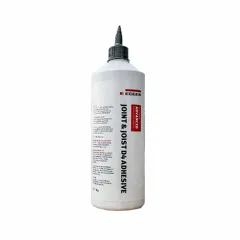
If you’re using Egger’s advanced structural flooring system (Egger Protect, Peel Clean Xtra, or P5), we’d suggest using Egger's Joint & Joist D4 Adhesive to bond it together. It’s five times stronger than a nailed fixing and so simple to use.

They also recomend the following approach:
1. Apply two parallel beads of Egger Joint & Joist Adhesive to the top of the joist
2. Lay the board across the joist and fix the first row of boards with only one mechanical fixing per joist from the board edge
3. Apply the adhesive directly to the groove and shoulder of the profile joint
4. Ensure the entire joint is bonded then move on to the next row of joists.
If the boards are butted tightly together, you may notice the adhesive starts likely to foam out of the board joint. Don’t worry, this is totally normal. Just leave it to dry and it will help enhance the protection of the joint.
You’ll typically need one 1kg bottle for every 6 boards you’re fixing, so make sure you have enough. All of our branches stock it, just ask at the counter if you need help.
How to lay chipboard
The best method of laying chipboard can vary depending on the chipboard you’re using and the environment you’re laying it in, but here are our general tips:
Pre-installation
Before laying chipboard flooring, it’s important that the boards are conditioned to the environment so that any shrinkage or swelling occurs before they are installed.
So make sure you store the boards in the room they will be fitted in for a minimum of 48 hours beforehand. This will reduce the risk of warping and shrinkage occurring when the floor has been laid.
If you’re laying the chipboard onto joists, ensure they’re dry too.
Mark the position of the joists
Take your carpenter’s pencil and mark the position of the joists on the walls. This will help you to align the short edge of the boards with the joists, as well as provide a marker for any chipboard screws you use.
Lay the chipboard
When laying your chipboard, position the boards lengthways across the joists. Make sure the small edge of each board sits over the centre of an exposed joist, covering half of it. You may need to cut your boards to achieve this.
Leave a gap
Always ensure there is a gap of at least 10mm around the edge of the flooring. This will allow the chipboard to expand without the risk of buckling. To achieve a consistent 10mm gap, try using packing shims between the boards and the wall.

Thinking about laying chipboard?
If you’re thinking about laying chipboard, we’ve got everything you need. Our stores stock a host of accessories to help you build, including chalk lines, carpenter’s pencils, goggles, masks, circular saws, spirit levels, and cordless drills. And don’t forget your glue!
Speak to your local Elliotts branch to get information on chipboard!